The following article is a guide for users who want to send custom email notifications within workflows, using xDM prior to version 2023.3.
For xDM version 2023.3 and more, a built-in automation is available, please refer to the documentation for more details.
Configure SMTP server
Emails will be sent using a SMTP Notification server that needs to be configured at the platform level (Welcome page > Configuration > Notification Servers).
This Notification server needs to have the Workflow Notification Server checkbox checked to be found by the plugin.
Install the Plug-in
Setting up custom email notifications requires the Email Sending Enricher plugin which can be found here: https://drive.google.com/file/d/1KOgZchW0aKMd1fbRChyEeZEwof_LmZhN/view?usp=drive_link
- Navigate to Configuration > Plug-In
- Click on the in install and update plugin.
- Add plug file.
- Once plugin is added make sure Status is set to Started
Create a new Email Entity
1. Create a new basic entity (named EmailPluginTest for this example)
2. Create 5 attributes on this entity:
| Name | Type |
| Recipients | String |
| Subject | String |
| HTMLBody | Long Text |
| Status | String |
| StatusMessage | String(4000) |
3. Create a new Plug-in Enricher and configure it as follows:
- Plug-in ID: Email Sending Enricher
- Plug-in inputs
- HTML Body
- Mail Recipients
- Subject
- Plug-in outputs
- Status
- StatusMessage

You can now test if the email plug-in is configured correctly by adding an email entity record in the UI. If configured correctly you will receive an email. Installing the plugin and creating an email enricher are the only steps needed for the plugin to work as expected (as long as you have a SMTP notification server correctly setup). If you are looking to email custom data. See below additional steps. |
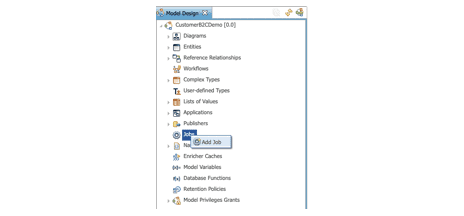
Create a NOTIFICATION_EMAIL Job
- Add a new Job
- Enter Job name (NOTIFICATION_EMAIL for this example) and select Next
- Select the Email Entity created earlier and click on Finish.

Create a Continuous Load Job

| You can test if the continuous load is working properly by connecting to the database and running the below query. This query will take the load id and email the values in the query. |
INSERT INTO dev4_test_mdm.sa_email_plugin_test<br>(b_loadid, id, b_classname, email_recipient, email_body, email_subject)<br>SELECT dev4_repo.get_continuous_loadid('NOTIFICATION_EMAIL'), 2, 'EmailPluginTest', 'fathia.jama@semarchy.com', 'Test3', 'test3'<br>&amp;nbsp;CREATE PLPGSQL Function In Database
You can create your own function to customize email notifications.
Here is an example:
CREATE OR REPLACE FUNCTION dev4_test_mdm.usr_insert_notification_email(p_loadid bigint)
 RETURNS void
 LANGUAGE plpgsql
AS $function$
DECLARE
 sql_error text; /* TODO: include error processing. For now we assume only a happy path of 1 valid record being selected and inserted. */
BEGIN
INSERT INTO dev4_test_mdm.sa_email_plugin_test
(b_loadid, id, b_classname, email_recipient, email_body, email_subject)
SELECT 5228, nextval('seq_email_plugin_test'), 'EmailPluginTest', 'fathia.jama@semarchy.com', 'Changes were made by ' || b_updator , 'Changes were made to ' || t.test_name
FROM sa_test t
;
END;
$FUNCTION$
;
CREATE Database Function in App Builder
Now that the Function is created in the database, you can declare it in Application Builder.
1. In the App Builder create a new database function.
2. In Function Arguments: add in any arguments needed in your function. In our example, only LoadID is required based on our database function.

Create a new Workflow
Now you can create the workflow that will trigger your email notification.
1. Create workflow and tasks as needed.
2. On the submit link > navigate to Triggers.
3. Add a new trigger.
4. Under Procedure, retrieve the Database Function declared previously and select "Post-Validation" as trigger type. Click on Next.
| Note: Pre- validation will send two emails. One when the workflow is submitted and another when you confirm to submit. |

5. Under Configure Procedure, open SemQL, and select the correct attributes:

6. Save and test your workflow in the UI.